| Solar Water Heater & Pasteurizer Made From Everyday Recyclables
| |
TOOLS and EQUIPMENT:
MATERIALS:
INSTRUCTIONS: From a 1 or 2 liter clear plastic soda bottle (A) cut off the top, 1" below where it becomes straight. Cut 4 tabs 1/2" wide x 1" long into the top (fig.1) Paint a 12 oz. aluminum can (B) with black paint . It is also possible to coat the can with carbon black from a candle or wood fire. Put the can filled with water into the plastic bottle bottom and insert top with tabs folded out (fig.2). To make the reflector (C), start with a piece of corrugated cardboard 1/8" x 24" x 32". Cover the cardboard with aluminum foil or potato chip bags with silver coating facing out (use wheat paste, glue or tape to adhere to cardboard). Cut and fold cardboard as shown. Make slots a little too small and narrow so that tabs fit snuggly. Place bottle on reflector (C) and place in sun. Keep bottle shadow centered on back of solar panel (D). To pasteurize, water must be heated to 158 degrees F for at least 15 minutes. * Reusable Water Pasteurization Indicators are available from Solar Cooker International For over 30 more projects made from Everyday Recyclables go to: http://www.larnedmarlow.com/Marlow/MarlowRecyclables.html or email, larnedmarlow@earthlink.net with "Recyclables Kit" in subject line. A copy of this project may be made for educational uses only. All other rights are reserved. © Eric Marlow 2003 |  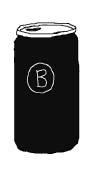 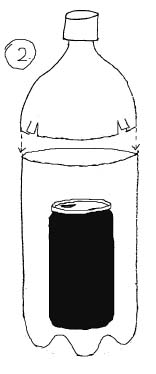 ©Eric Marlow 2003 |
Monday, March 31, 2008
Solar Water Heater & Pasteurizer Made From Everyday Recyclables


Wednesday, March 26, 2008
Rocket stove
Rocket stove
From Solar Cooking

The Rocket stove is a variety of wood-burning cooking stove. It is easy to construct, with low-cost materials. These are low-mass stoves designed to burn small pieces of wood very efficiently. Cooking is done on top of a short insulated chimney. The stoves are typically constructed out of trash: tin cans, old stovepipes, etc. A skirt around the pot will help hold heat in, increasing the efficiency.
Rocket stoves use branches, twigs, small wood scraps, or just about any small combustible material. The pieces of wood or other material burn at their tips, increasing combustion efficiency, creating a very hot fire, and eliminating smoke. The low-mass stove body and insulated chimney assure that the heat goes into the cooking pot, not into the stove. Rocket stoves used in conjunction with hayboxes can save enormous amounts of fuel, cooking complete meals while using very few resources.
A related design, the rocket bread oven, is constructed using two 55 gallon drums, one inside the other. The outer drum is split open to create an insulated chimney space between the two drums and to allow for a doorway. Baking is done inside the inner drum--in a sealed compartment within the chimney, above the firebox.
Contents[hide] |
[edit] Overview
It operates roughly twice as efficiently, and substantially more cleanly, than the open fire cooking methods still used in many areas of the world. Furthermore, the design of the stove requires small diameter lengths of wood, which can generally be satisfied with small branches. As such, sufficient fuel for cooking tasks can be gathered in less time, without the benefit of tools, and ideally without the destruction of forested areas.
Because these qualities improve local air quality, and discourage deforestation, the rocket stove has attracted the attention of a number of Appropriate Technology concerns, which have deployed it in numerous third-world locales (notably, the Rwandan refugee camps). This attention has resulted in a number of adaptations intended to improve convenience and safety, and thus the size of the target audience. The Justa Stove, for example, is a cousin of the rocket stove adapted for indoor use and family cooking needs.
[edit] Key features

- Fuel magazine - a short length of steel or ceramic pipe fitted horizontally into the base of the chimney
- Fuel shelf - holds the fuel clear of the bottom of the magazine to allow air to flow underneath
- Chimney - a metal box (such as a 5-gallon tin can) or pipe standing vertically and supporting the cooking vessel
- Heat exchanger - a tubular metal shield that forces hot gases from the chimney to pass over the sides of the cooking vessel
[Text for this page was borrowed from Wikipedia:Rocket stove and from http://www.lostvalley.org/haybox1.html.]
[edit] Problems
Overview: Fire based solutions, such as the Rocket Stove, allow cooks to make meals when the sun isn't shining or achieve temperatures that would be difficult without expensive parabolic cookers. However, they do have drawbacks:
- Pollution Though burning wood is nearly neutral in terms of the production of greenhouse gases, it is possibly the most injurious common form of generating heat in terms of particulate emissions and other pollutants. The Union of Concerned Scientists give wood burning an environmental rating of 21,000 per dollar of expenditure for common pollutants and 27,000 per dollar for toxic pollutants. By comparison, solid waste disposal, the next highest rated group, resulted in numbers of around 1400 and 300 respectively for the same categories.
- Efficiency The book, "Capturing Heat II" by the Aprovecho Research Center suggests that without a skirt the Rocket Stove is only about as efficient as a well-run open fire. With the addition of a skirt that efficiency rises, but is still less than the 40% that is sometimes cited.
- Maintainability Tin can stoves that this author has purchased or made have disintegrated due to rust after 3 to 6 months. Its possible to build longer lasting ones by surrounding the internal cans with a mix of sand and clay but of course that means that the stove will have a higher thermal mass resulting in greater fuel usage.
[edit] Alternatives/Variations


Another new alternative biomass type stove will be available by summer, 2008 called the Wood Pellet Camp and Survival Stove, from ClearDome Solar Thermal It is very clean and hot burning, also burns twigs and branch parts, weighs about 2 pounds and is easy to transport and use. Wood pellets are carbon neutral and very inexpensive- it's a dry fuel product with very little pollution. Unlike other small pellet cook stoves, no fan or external power is needed to generate 1500+ degree F temperatures, hotter than a conventional stove for short cook times. The photo shows the 5" x 7" tall pellet cooker on the beach at sunset.
Tuesday, March 25, 2008
Double-Angled-Twelve-Sided (DATS) Solar Cooker
Double-Angled-Twelve-Sided (DATS) Solar Cooker (en español aquí)
(Editor's note: SCI has not tested this cooker for safety, effectiveness, stability, or ease of use)
by Teong H. Tan
 I was introduced to the world of solar cooking in 1982 when, as a student, I was working on a heat-transfer experiment at the Brace Research Institute in Montreal. Brace had shortly before that experimented with and tested a variety of solar cookers. Many years had passed by for me without any further solar cooking exposure until I discovered Solar Cookers International’s web site three years ago. The site has since become the place where I catch up on solar cooking activities.
Background
The “CooKit” is one of my favorite solar cookers. After reading about difficulties many people face locating heat-resistant bags, and experiencing how ordinary plastic bags melt on contact with hot cooking pots, I started to explore the possibility of a simple, low cost, easy to construct cooker that requires no plastic bag. I have designed one that I call Double-Angled-Twelve-Sided (DATS) solar cooker. It seems to do the job on clear, sunny days.
DATS cooker employs 24 small reflective panels to concentrate extra sunlight to compensate for the heat loss from not using a plastic bag. DATS cooker design is similar to a deep-focus parabolic cooker, but instead of using a true parabolic curve, multiple flat panels concentrate sunlight onto the cooking pot. Two reflective surface-angles, 45º and 60º, are used so that a bend can be introduced in between for structural rigidity to hold the cooker’s shape. This structural rigidity allows for DATS cooker to be constructed out of cardboard material.
A DATS cooker, tested in Shanghai, reached a maximum temperature of 140ºC (284ºF) inside an empty black cooking pot, on a clear sunny day with 21ºC (70ºF) ambient air temperature and a slight breeze. Eggs became hard-boiled in 30 minutes and two cups of rice cooked in 95 minutes. The cooker should be re-positioned every 45 minutes or less for better efficiency.
A simple supporting structure, made out of bamboo or wooden sticks, is built-in as an integral part of DATS cooker to support the cooking pot at the desired cooking position.
DATS cooker is held rigid by a string, which links all twelve 45º-panels together at the bottom end. The string is made taut by twisting in the loose string loop around a short stick. The tighter the string is, the better DATS cooker holds its shape. If needed, a small gage string, tied across two opposite panels, at 3:00 o’clock and 9:00 o’clock position, can be used to pull in any slack in the cooker shape due to gravity. By loosening the string and removing the cooking pot supporting structure, DATS cooker can be folded up for storage or transportation.
Required materials are cardboard, aluminum foil, white glue, paper tape, small bamboo/wooden sticks, and string.
Construction
Cut 12 rectangular pieces of cardboard measuring 24cm x 61cm each.
Trace and cut the following shape on each cardboard panel. Make a straight fold at 24cm distance from the small end of the panel. Punch a hole in each of the two “ears” at the narrow end of the panel, as shown, and fold the ears away from you.

Place the panels side by side, along the longest edge of each panel, and tape them together until all 12 panels are joined to form a ring. Glue aluminum foil on all inside surfaces of the cooker.
 tape together panels along longest side
 all 12 panels form a ring
Pass a string through the punched ear holes at the lower end of the cooker, to join the lower panels together. Twist the loose string loop around a short stick, to pick up the slack in the string and form a rigid, deep parabolic sort of shape. For added efficiency, cover the round opening at the bottom of the cooker with a reflective disk.
 string joins panels together
 short stick picks up string slack
 outside of completed cooker shell
 inside of completed cooker shell
To construct the pot support, puncture a small hole in the middle of the lower half of four of panels. Push two 35cm-long bamboo/wood sticks, in parallel, through the four holes, to form a pair of support rails for the cooking pot. Small pieces of cardboard are then glued on the outside, along the bottom of the two protruding sticks, for additional rail support. Tie the exposed stick ends on the outside with rubber bands to prevent the sticks from sliding. Attach two 29cm-long bamboo/wood sticks, perpendicular to the rails, and sandwich the bottom end of the sticks between the lower panel folded ears. Connect the two perpendicular junctions of the rails/sticks with a wire or string for added pot stability, allowing pot loads of up to 2.5kg.
 protruding sticks with small cardboard supports
 completed pot support structure
The DATS cooker is now ready for use. Position the cooker to face the sun directly. A black pot, with food inside, can now be either placed flat or angled on the support rails to be cooked by the heat generated from the reflected sunlight.
Monday, March 24, 2008
A Portable Parabolic Cooker Built from an Umbrella
A Portable Parabolic Cooker Built from an Umbrella
Juan Francisco Paredes. Email: juanfranciscoparedes@gmail.com


I would like to relate my experience and describe my solar cooker in order to thank all of those who have done so previously and have inspired me, and so that anyone else can learn from my experiences, which have shown that it works: Half a litre of water began to boil in 20-30 minutes and this was on a windy day. My objective was to get results close to those of commercial parabolic cookers, but in a portable design since I do not have a terrace or yard with space for a cooker. White rice for 4 people cooked in approximately one hour - and it was a little overdone!


I learned about solar cookers two months ago, primarily thanks to Solar Cookers International, and I put myself to work: I just had to try it! Cook with the sun? And after many attempts and disappointments, I eventually obtained better results than I had hoped for.
Before making this model I made a paracocina,but instead of aluminium foil I used the sunscreens for car windshields for improved strength, but they were disappointing. Probably this was because these sunscreens were not good reflectors, in addition to other factors such as not being able to find an adequate plant stand of the right size and the fact that the umbrella had ten ribs.


My model is based on paracocina designed by Marc Ayats http://www.cuinessolaar.iespana.es/ and the Sumbrella designed by Quinton Stowell http://www.sunspot.org.uk/ , but with some differences:
Reflector
The most important and difficult item to find is the umbrella. It should be an umbrella with sixteen ribs of 1 – 1.2 cm in diameter, which are not easy to find as most umbrellas have only 8 or 10 ribs. I located one of these in an online store at http://www.bazarfrancia.com/ . It cost me 15 € with shipping costs.


Using the same procedure as that for the paracocina I cut off the shaft of the umbrella but I don’t use it for closing; instead I fold it so that it is easier to carry. In order to position the structure I use a screw that fits into the drilled hole on the shaft. I left a part of the closing strap for storing it as you can see in the central photo. In addition, I had to attach a couple of tension cords to stabilize the cooker in the wind.
As for reflective material, I thought over various possibilities. I think I found something ideal but I didn’t use it since I live in the
This material is used for lighting. A sheet of 2000x1000x0.4m/m weighs about 2.20Kg and costs between 4.85€/Kg. to 5.55€/Kg. The quantity needed depends on the size of the umbrella used.
Apart from this, I went back and forth between various possibilities because aluminium foil has the disadvantages of wrinkling easily, and it won’t stand up to all the repeated opening and closing of the umbrella. In my opinion, the more polished, shiny and mirror-like a material is the better. I came across various: aluminium tape that is used for heating systems, aluminized cardboard, and adhesive plastic that can be easily found in fabric or stationary stores, which is what I finally used. .


The stand and grill
I used a compact camera tripod because I was not able to find a plant stand of the right size, though I know they do exist. With this tripod I gained in portability and precision because you can adjust the height in order to find the exact focal point. The umbrella with 16 ribs provides a very precise focal point in the direction of the shaft. Its disadvantage is that it is more fragile and more expensive, about 20€.
For the grill I glued a small barbecue grill with high-temperature resistant silicon. This is the weakest point of my model because if you’re not careful the grill can fall off the tripod. I think that ideally the grill should be soldered onto the tripod
I positioned the silicon glue such that it maximizes the stability of the cooking pot. The pot doesn’t move at all.
The cooking pot
The cooking pot gave me plenty to mull over: what would be the best type? If I let my imagination run wild, I thought that the ideal solar pot would be a Pyrex pressure cooker in which one could place various black pots of different forms and sizes. But let’s stop dreaming. In order to select the type of pot, I read practically all of the reports on every type of solar cooker that I could find, these are the conclusions that I came to:
· Material: aluminium or thin steel.
· Type: lower is better than high, but with enough height for cooking. A low pot or a high frying pan is best.
· Color: black.
· Lid: black is better than glass.
· Size: 20 cm in diameter. About 1.5-2 litros. At first I thought that the smaller the pot the more quickly it would heat up, but then I realized that a small pot is less efficient because it captures fewer rays..
Personally I like frying pans or casserole dishes because they have most of these characteristics and they may come with pressure lids that maintain the heat. Steel ones are stronger than aluminium. Unfortunately I haven´t seen any that are black. They are all the colour of metal. One solution is to paint them with a black matte heat-resistant spray paint that is used for barbecues. It is not expensive and with practice good results can be achieved. .


In addition, I used a second frying pan made of glass in order to insulate the first one. It is a bit bigger so I stuck on bits of cardboard for a better fit.
Recommendations
Don’t take it lightly. It really heats up. In order to prevent any type of risk, it’s best to use gloves and sunglasses. Also it’s better to cook while standing behind the cooker. That way you also don’t create shadows on the reflector.
In order to capture the maximum solar radiation it’s necessary to turn the cooker at least twice an hour so it faces the sun. Turn it very slowly and carefully holding the stand and the pot or else removing them for a moment.
For transporting the pots it’s a good idea to use a basket in which they fit well. The basket will protect them as well as help conserve the heat.
I carried out this Project with lots of interest and a fair bit of effort. I hope that it helps in some way. If you decide to try it out, please, I would love to hear about your experiences. If you wish, send me an email. I think that vegetables cooked in their own juices, and new potatoes cooked in their skins would be delicious. Why not try them?Tuesday, March 18, 2008
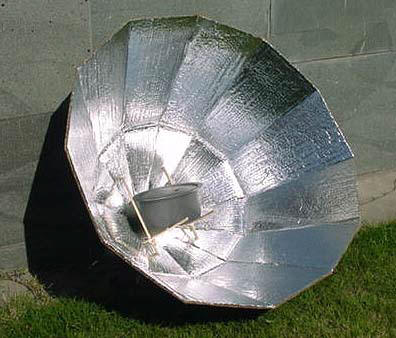
Prototype Solar Stoves
For the Peru Children’s Trust.
During the summer of 1999 I set about making our first prototype. It was made from 0.7 mm thick AnocoilÓ aluminium, which is almost mirror quality and some steel tubing. The reflector profile opens out like a fan, as each segment pivots about the middle. Around the edge is a rubber strip that fits over the edge of the aluminium and keeps it all together. We found that the 0.7 mm aluminium is a bit thin to support its own weight so it sagged in the middle. This was overcome by clamping a conical support underneath. We also found that it was a bit wobbly and the focal point would move if there were any wind. Despite this it does work well on sunny days and looks cool. It also packs up very well so is ideal for camping. It isn't ideal for developing countries, as it isn't that stable and the aluminium was too heavy for my suitcase. As each sheet overlaps the next the reflection tends to be at an angle, so the focal point is not as accurate as the other prototypes. It is 1.2 m in diameter, which is equivalent to 1m2 of sunlight but probably only 60% efficient.
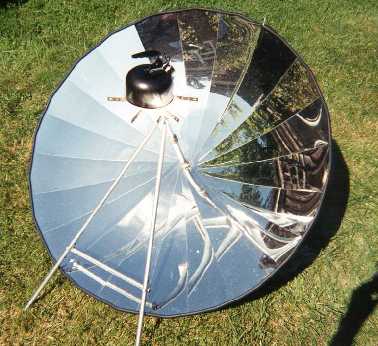
The second cooker was designed from the book ‘Cooking with the Sun: How to Build and Use Solar Cookers’ by Beth and Dan Halacy. Despite taking a while to make it was much more efficient. The reflecting profile was made from 24 cardboard ribs located radially every 15 degrees. Each of the 24 reflective segments is then taped down to the ribs. We made the box and reflector 1 m x 1 m and this time the efficiency and stability were much better. On a sunny day it is easy to boil potatoes and fry sausages. To test the focal point we placed a sheet of newsprint where the pot should go. The heat was sufficient to make it burst into flames in seconds. Our only criticism is that it would be better if the reflector was made from fewer parts, and after 4 months in a damp garage the cardboard has started to sag and lose its shape.
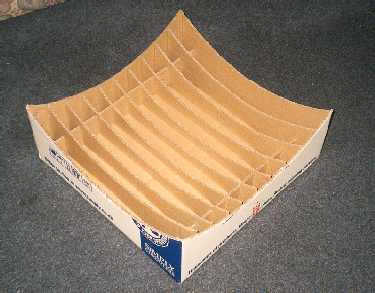
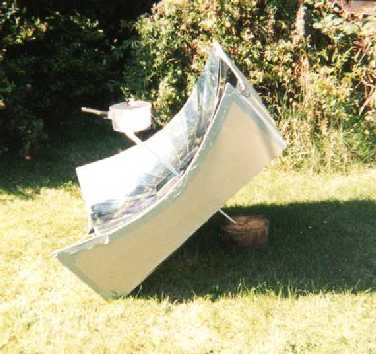
Our third model was more stable, simpler to make and more efficient. We used the 'wine box' principle of interlocking cardboard to create the required shape for the reflector to fit into. This was a mini-version only 0.5 m x 0.5 m and designed the rib shapes on the computer. The reflector profile is spherical with a radius of 0.5 m (equal to the square size of the enclosure). This gives an almost parabolic shape with a focal point at 0.25 m from the reflector. Each rib is 0.05 m apart and 11 ribs are required to make the shape. Each rib has a different radius depending on its location.
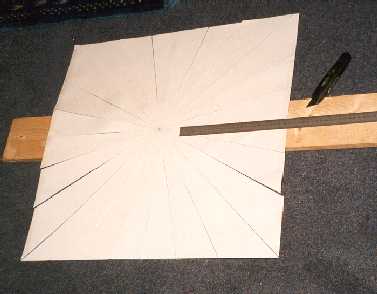
The reflector was made from one piece of 0.3 mm thick AnocoilÓ aluminium. I marked on 15 degree angles and then cut through with a very sharp knife leaving an area in the middle uncut. Take care of your fingers!
We then placed the reflector on top of the card profile and cut the edges to length. The reflector was then taped down around the edges, which produced an accurate focal point.
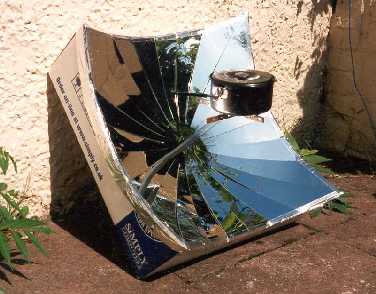
The grill was made from a 16 mm steel tube and some strips of brass bar. A pivot point in the middle allows for variations in sun height.
This mini-stove has an area of only 0.25 m2 but was still able to boil water. It was also quite easy to make, so we decided it was this model that we would 'scale up' and make from wood in Peru.
The Solar Cookers we made in Peru were 700 x 560 mm. I have also designed a unit 1 x 1 m called Solar1000 that will give more heat.
Sunday, March 16, 2008
Prototype Solar Stoves
For the Peru Children’s Trust.
During the summer of 1999 I set about making our first prototype. It was made from 0.7 mm thick AnocoilÓ aluminium, which is almost mirror quality and some steel tubing. The reflector profile opens out like a fan, as each segment pivots about the middle. Around the edge is a rubber strip that fits over the edge of the aluminium and keeps it all together. We found that the 0.7 mm aluminium is a bit thin to support its own weight so it sagged in the middle. This was overcome by clamping a conical support underneath. We also found that it was a bit wobbly and the focal point would move if there were any wind. Despite this it does work well on sunny days and looks cool. It also packs up very well so is ideal for camping. It isn't ideal for developing countries, as it isn't that stable and the aluminium was too heavy for my suitcase. As each sheet overlaps the next the reflection tends to be at an angle, so the focal point is not as accurate as the other prototypes. It is 1.2 m in diameter, which is equivalent to 1m2 of sunlight but probably only 60% efficient.
The second cooker was designed from the book ‘Cooking with the Sun: How to Build and Use Solar Cookers’ by Beth and Dan Halacy. Despite taking a while to make it was much more efficient. The reflecting profile was made from 24 cardboard ribs located radially every 15 degrees. Each of the 24 reflective segments is then taped down to the ribs. We made the box and reflector 1 m x 1 m and this time the efficiency and stability were much better. On a sunny day it is easy to boil potatoes and fry sausages. To test the focal point we placed a sheet of newsprint where the pot should go. The heat was sufficient to make it burst into flames in seconds. Our only criticism is that it would be better if the reflector was made from fewer parts, and after 4 months in a damp garage the cardboard has started to sag and lose its shape.
Our third model was more stable, simpler to make and more efficient. We used the 'wine box' principle of interlocking cardboard to create the required shape for the reflector to fit into. This was a mini-version only 0.5 m x 0.5 m and designed the rib shapes on the computer. The reflector profile is spherical with a radius of 0.5 m (equal to the square size of the enclosure). This gives an almost parabolic shape with a focal point at 0.25 m from the reflector. Each rib is 0.05 m apart and 11 ribs are required to make the shape. Each rib has a different radius depending on its location.
The reflector was made from one piece of 0.3 mm thick AnocoilÓ aluminium. I marked on 15 degree angles and then cut through with a very sharp knife leaving an area in the middle uncut. Take care of your fingers!
We then placed the reflector on top of the card profile and cut the edges to length. The reflector was then taped down around the edges, which produced an accurate focal point.
The grill was made from a 16 mm steel tube and some strips of brass bar. A pivot point in the middle allows for variations in sun height.
This mini-stove has an area of only 0.25 m2 but was still able to boil water. It was also quite easy to make, so we decided it was this model that we would 'scale up' and make from wood in Peru.
The Solar Cookers we made in Peru were 700 x 560 mm. I have also designed a unit 1 x 1 m called Solar1000 that will give more heat.
